How to create a DigitalOcean droplet for hosting Spring Boot app using Terraform
1. Overview
In this article, we’re going to be creating a new DigitalOcean droplet to host a Java (Spring Boot) web application using Hashicorp Terraform.
2. Terraform Basics
Terraform simplifies the process of setting up a new server with the help of configuration files.
Terraform configuration files are plain text files with a .tf extension. The contents of a Terraform configuration file
is composed of Hashicorp Configuration Language (HCL).
The language consists of blocks, expressions and arguments, and they instruct Terraform on how to manage cloud resources like server instances, networking, DNS etc.
Cloud providers form the core of Terraform. Different cloud providers like AWS, Microsoft Azure, Google Cloud Platform, DigitalOcean implement APIs exposed by Terraform.
In this article, we’re going to focus on using DigitalOcean as our cloud provider, hence it’s recommended to create a DigitalOcean account. It’s required that we download Terraform and add the executable binary to our CLI path, if not done already.
Let’s create a directory that will contain all our Terraform configuration files and initialise it as a Git repo:
|
|
3. Provider Setup
Let’s create a provider.tf file in the terraform-demo directory with the following content:
|
|
In the snippet above, the first required_version defines the Terraform version our configuration files will conform to.
Furthermore, we also declare a dependency on digitalocean provider version 2.0.
Now that we have a provider definition, let’s initialise our working directory as a Terraform project by executing the following command from the terraform-demo directory:
|
|
If this is successful, we should see this line in the console, among other lines:
|
|
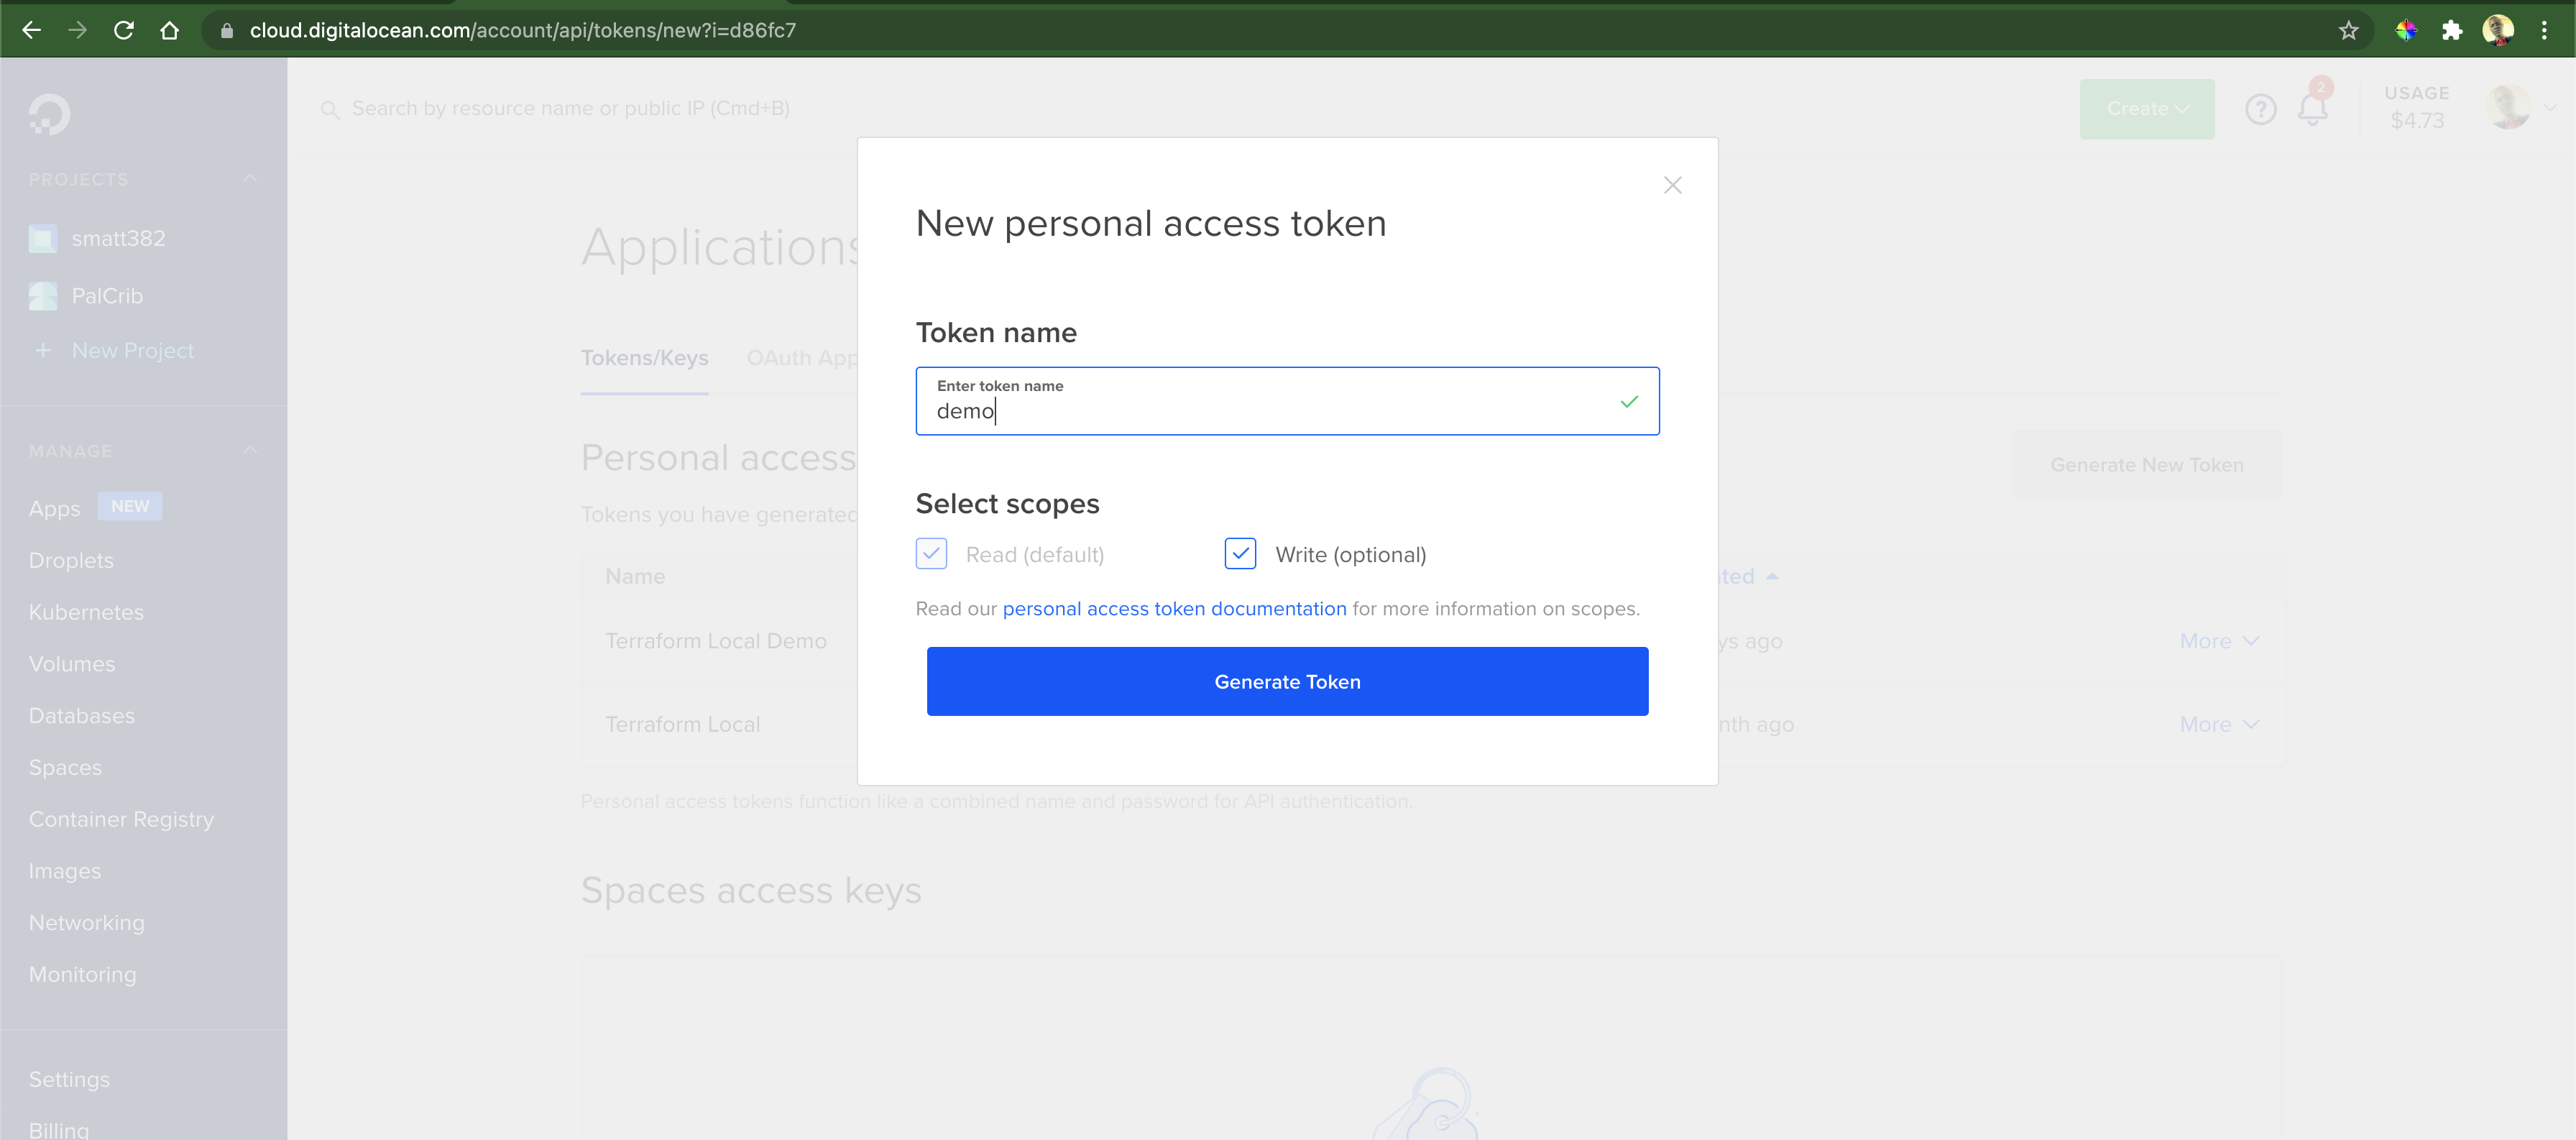
In order for Terraform to be able to communicate with our provider - DigitalOcean, we need to configure a valid access token. We can generate a new API token by going to API » Token/Keys on the DigitalOcean dashboard.
When we click on the Generate New Token button, it will show us a modal where we can provide a name for our token and set its permissions:

Let’s update the provider.tf configuration file with the new token:
|
|
The API token is sensitive information that should not be in the public domain. Fortunately, Terraform allows variables in configuration files.
Therefore, we will create a terraform.tfvars file in the terraform-demo directory with the following content:
|
|
Let’s update the provider.tf accordingly:
|
|
By default, Terraform will try to read the do_token variable from any .tfvars file present in the root directory.
If there’s none, it will prompt us to provide a value for it on the CLI when processing the configuration file.
The best part with this approach is that we can add terraform.tfvars to .gitignore to exclude it from Git.
We need to configure the SSH key that Terraform will use to access the server instance we will create in later parts of this article. Let’s start by generating a password-less SSH keypair:
|
|
When prompted to Enter file in which to save the key we will supply ./demo and when prompted for a passphrase,
we will press the Return/Enter key which means we want to use an empty passphrase.
In the end, we will have two new files demo and demo.pub in our current directory.
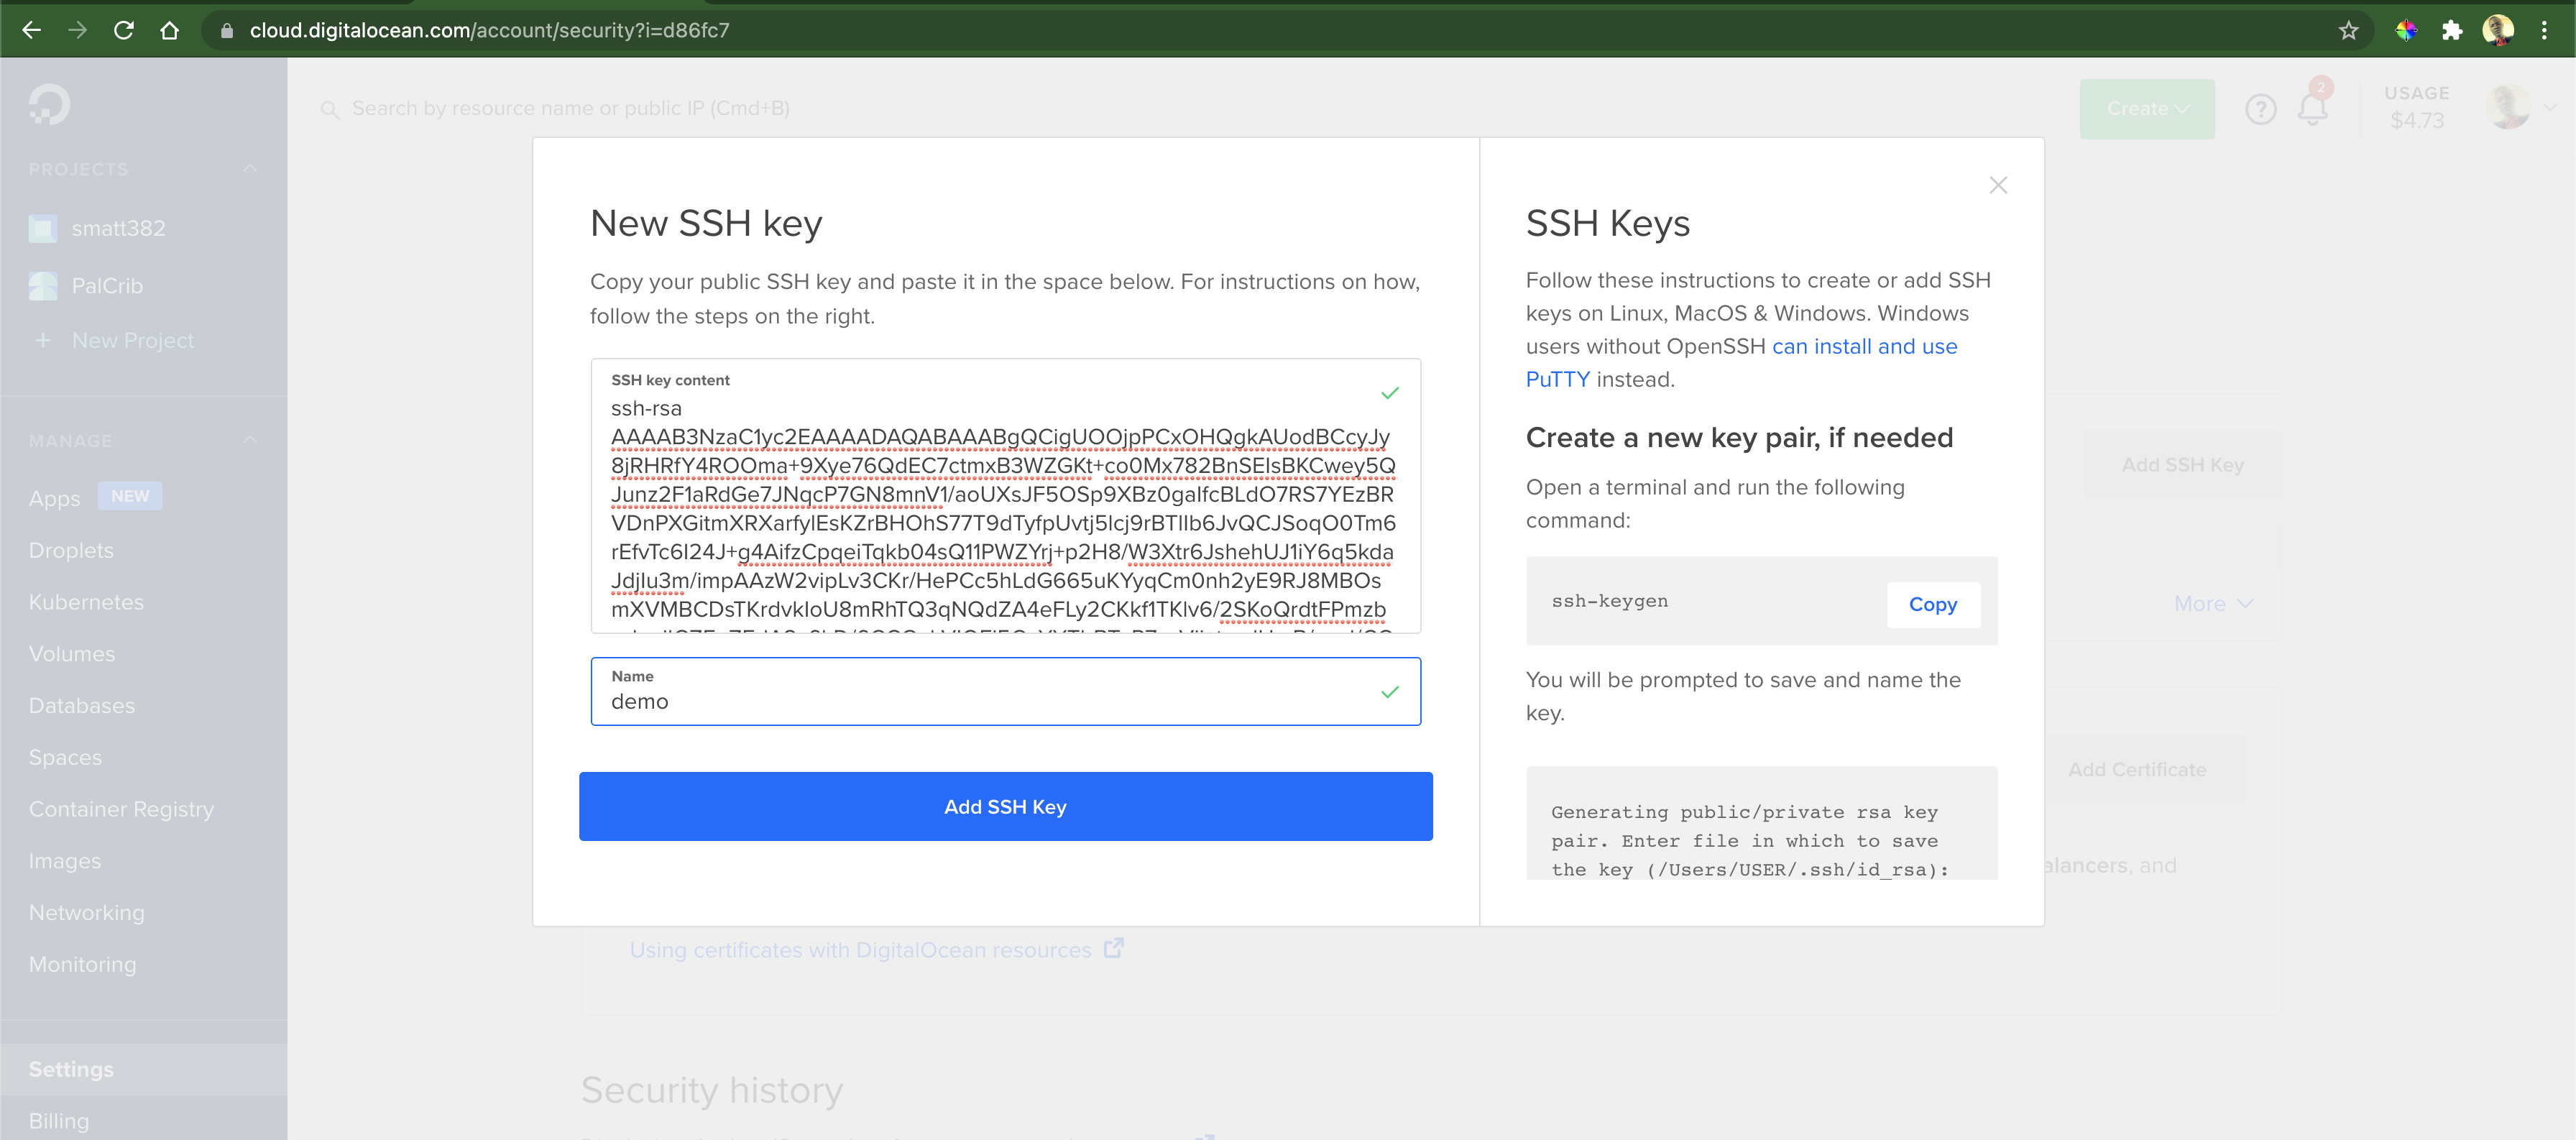
We need to copy the content of demo.pub and paste it in Setting » Security » Add SSH Key on the DigitalOcean web portal:

Let’s add the following content to our provider.tf file:
|
|
Up until now, we’ve defined blocks that start with terraform, provider and variable. The data block is a special one that instructs Terraform to
read information from an external source. In this case, we’re asking Terraform to read a digitalocean_ssh_key with the name “demo”
from DigitalOcean.
The complete provider.tf file, up until this point, should look like this:
|
|
4. Resource Setup
The resource block of a Terraform configuration file describes one or more infrastructure objects like server instances,
virtual networks and DNS records.
What we want to do in this section is to create a new DigitalOcean droplet type resource that we can configure to host our demo Spring Boot application.
Let’s create a new file called server.tf, in the terraform-demo directory, with the following content:
|
|
In the snippet above, we declared that Terraform should create a new DigitalOcean droplet with the name demo-server.
The droplet will have 1 vCPU and 1GB of RAM and be created in the fra1 region.
Also, we enabled monitoring for the droplet and set the SSH key to be the one we configured earlier.
At this stage, we can plan and apply the Terraform configuration we’ve been building up till now.
Let’s run the Terraform plan command, so we can have an overview of what Terraform will do:
|
|
This will produce a similar output to the following:
|
|
From the output, we can infer that Terraform will add 1 DigitalOcean droplet instance in the fra1 region with the SSH key that we supplied and
the size we specified.
That’s good enough for us to apply our configuration:
|
|
This will prompt us to input ‘yes’ to proceed and on success, we should see a similar output to this:
|
|
Let’s add a connection block to the existing resource block in the server.tf:
|
|
Terraform will use the information we provide in this connection block to SSH into the server and execute some scripts automatically, during setup.
This expression file(var.pvt_key) uses the file function to load the private key.
However, instead of supplying the actual path, we’re using a variable pvt_key and we need to declare it in provider.tf:
|
|
Let’s also add the actual value to terraform.tfvars just as we did for the DigitalOcean token:
|
|
Next, we’ll use Terraform’s remote-exec provisioner to invoke scripts that will install Nginx and Java JRE. Let’s add the following content to the server.tf file:
|
|
Each block of remote-exec provisioner executes a series of commands that we would have to execute manually if we’re not using Terraform.
There are other configurations tasks that go into making a server instance production ready, like creating a dedicated system user, setting up a systemd service and firewall. We’ll automate these operations by adding appropriate scripts to the server configuration file.
The complete server.tf file looks like this (with added comments to make it more readable):
|
|
Apart from remote-exec, we also use a file provisioner to copy some files from our local machine to the server.
The next thing is for us to apply our changes but first, we need to destroy the older version and then apply the new update, typing ‘yes’ every time we’re prompted:
|
|
After applying the final update successfully, we can get the ipv4_address of the instance by running:
|
|
With the ipv4 address, we can SSH into the server and/or open it in our web browser to see our demo application running. It should print “Hello World” and the current timestamp.
Since this is a demo setup, we should clean up the resources to avoid unnecessary costs:
|
|
5. Conclusion
In this tutorial, we’ve seen how to use Terraform to manage different cloud infrastructures. We provisioned a new server instance, copy files to it, execute shell scripts and install the required software. This article is an eye-opener, and we can do much more with Terraform.
We can make our Terraform configuration more modular and portable by using variables where applicable.
For further reading, please consult the complete DigitalOcean provider documentation here and the complete source code is available on Github.
Happy Coding
